How to Properly Install Pavers: Essential Tips for a Beautiful Outdoor Space in 2025
Transforming your outdoor space with pavers can enhance its aesthetic appeal and functionality. Whether you’re looking to create a patio, walkway, or driveway, understanding **how to install pavers** is crucial for achieving a long-lasting and beautiful result. In this article, we will provide a comprehensive **paver installation guide**, covering everything from preparation to maintenance, ensuring you have the knowledge to succeed in your DIY project.
Preparation for Paver Installation
Before diving into the **steps for installing pavers**, thorough preparation is essential. This phase sets the foundation for a successful installation, ensuring your project goes smoothly. Start by selecting the right paver materials that suit your outdoor design vision. Consider factors like climate and drainage needs when choosing **types of pavers**. Next, evaluate your site; take measurements and determine the area for your paver project, considering factors such as sunlight, shade, and the flow of foot traffic.
Gathering Materials and Tools
Your **paver installation tools** list includes basics like a shovel, level, and rubber mallet, but also specialized tools like a paver saw and compactor. Ensure you have all necessary **materials needed for paver installation**, including a base layer of gravel or sand, polymeric sand for joints, and edging materials for stability. Proper tools and materials not only simplify your process but also yield a more professional look.
Calculating Paver Quantities
Understanding **calculating paver quantities** is crucial to avoid unnecessary trips to the hardware store. Measure the area you plan to pave, factoring in the size and shape of the pavers you’ve selected. Use a reliable formula—(length x width = area) below any expected disturbances. Also, allow for breaks and cuts, which influences your total paver quantity. This calculation prevents costly missteps in your project.
Steps for Installing Pavers
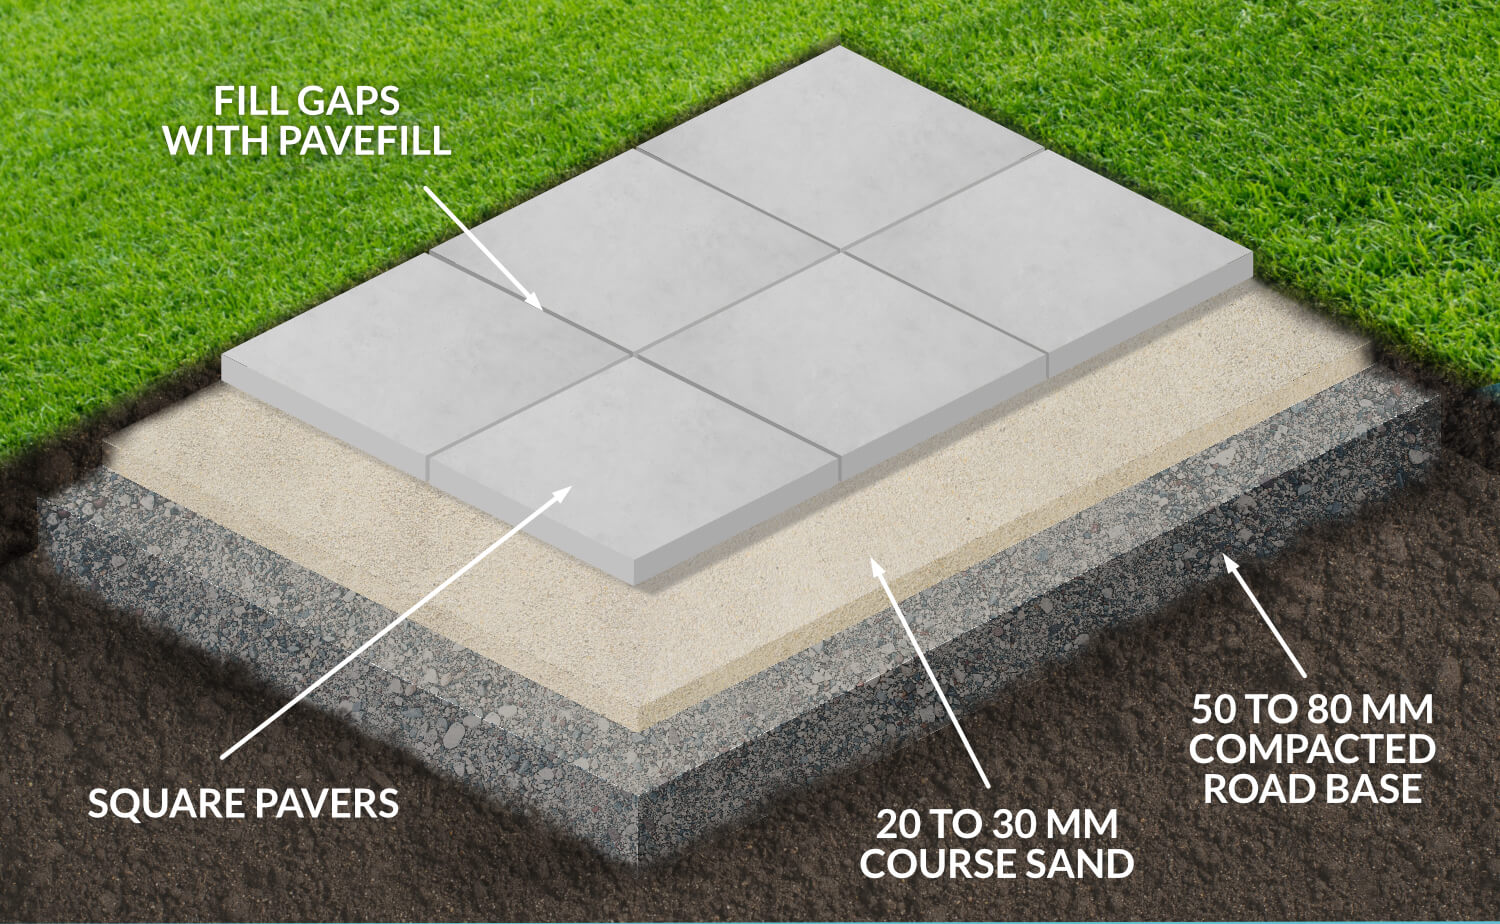
Having laid the groundwork, let’s dive into the **step-by-step process for installing pavers**. Failing to adhere to these steps can lead to potential setbacks in your installation. Begin by excavating the area to a depth of at least six inches; this will allow for the **paver base layer** and proper drainage. Afterwards, layer and compact gravel or sand—sufficient compaction ensures a stable base while optimizing drainage for longevity.
Leveling Ground for Pavers
Proper **leveling ground for pavers** is paramount in ensuring water drains effectively away from the pavers. As you lay the base, use a level to confirm an even surface, sloping away from structures to prevent water pooling. With a smooth and secure base, set your pavers and make adjustments to align with your desired design patterns. Consider laying pavers on gravel, providing additional drainage which is particularly relevant in wetter climates.
Installing Pavers in a Pattern
Next, get creative with **installing pavers in a pattern** that enhances your outdoor aesthetic. Popular patterns include herringbone, basket weave, and running bond. Always dry lay a small section first to visualize your design and adjust as necessary. Use spacers or chalk lines to maintain uniform gaps for sand or jointing techniques; this is essential for a neat finish and helps reduce future maintenance.
Paver Edging Installation
Once your pavers are laid, **paver edging installation** is crucial for maintaining their position. Without proper edging, pavers can shift over time, compromising both the appearance and function of your project. Edging materials can include plastic or metal restraints that secure the paver edges while providing a clean look. This is particularly important in areas with high foot traffic or vehicular load.
Sealing Installed Pavers
After installation, consider **sealing installed pavers** to protect against stains and enhance longevity. Sealing helps in preventing weed growth in pavers and upgrading aesthetic appeal. Choose the right type of sealer based on your paver material; solvents or water-based sealers offer differing levels of protection and finishes. Apply the sealer when the pavers are completely dry to ensure adhesion. Regular sealing will maintain their beauty for years to come.
Common Paver Installation Mistakes to Avoid
Many DIY enthusiasts face pitfalls during their first attempt. Understanding **paver installation mistakes to avoid** is crucial. Common errors include neglecting drainage considerations, improper compaction, and using the wrong materials for the foundation. Additionally, failing to maintain proper alignment during installation can lead to frustration and a less appealing final result. Keep these pitfalls in mind to enjoy a smooth paver installation experience.
Maintaining Installed Pavers
Once your pavers are set, the task of **maintaining installed pavers** begins. Regular maintenance not only enhances their visual appeal but also extends their life. Start with routine cleaning—use a broom to remove debris, and consider giving them a wash with mild soap and water, especially after winter. Occasional reapplication of polymeric sand between joints helps keep weeds at bay and preserves the stability of your pathway.
Seasonal Paver Care
Each season brings unique challenges for **seasonal paver care**. In spring, clear out debris borne by winter weather and check for any frost heave. During summer, look for signs of weeds and use appropriate herbicides if necessary. In fall, consider moving leaves promptly to prevent staining and mold growth. Lastly, don’t forget to inspect joints heading into winter to prep for snow removal, preventing damage and keeping your outdoor space looking pristine.
Paver Maintenance Tips
Finally, utilize some effective **paver maintenance tips** to keep your outdoor space beautiful. Regularly inspect for paver shifting or cracks. Additionally, maintaining the foundation beneath your pavers through effective drainage practices helps to sustain correctness in placement. Regular sealing and requested re-leveling ensure that your hardscape lasts for multiple seasons without requiring drastic repairs.
Key Takeaways
- Preparation is vital: Choose the right paver materials and perform necessary site evaluations.
- Follow structured steps for installing pavers, focusing on a firm base and proper drainage.
- Take extra care with paver edging and sealing to maintain integrity and appearance.
- Regular maintenance extends the life of your pavers and keeps your outdoor space looking pristine.
- Avoid common installation mistakes by planning and preparing thoroughly.
FAQ
1. What are the types of pavers suitable for outdoor use?
There are several **types of pavers** suitable for outdoor applications, including concrete, brick, stone, and permeable pavers. Each type offers unique characteristics; for example, permeable pavers allow water to seep through, which aids in drainage and reduces runoff. Consider your specific needs, such as aesthetics, functionality, and ease of maintenance, when making a selection for your project.
2. How do I prevent weed growth in my pavers?
To prevent weed growth in your pavers, make sure to meticulously compact your base layer and fill joints with polymeric sand. This sand hardens when wet, creating a barrier that inhibits weed seeds from taking root. Additionally, regular cleaning and maintenance can contribute to weed control, ensuring your pavers remain clean and aesthetically pleasing.
3. How much does paver installation cost?
The **paver installation cost** varies significantly based on factors such as the size of the area, type of materials chosen, and labor costs if hiring professionals. On average, costing anywhere from $10 to $20 per square foot can be a good ballpark, considering materials and installation. Calculate your space costs against your budget for accurate planning.
4. What are the best practices for cutting pavers to size?
When **cutting pavers to size**, using a specialized paver saw offers the best precision. Mark the paver and stabilize it before cutting to ensure safety and accuracy. If you don’t have access to a wet saw, you can use a chisel and hammer for smaller cuts. Safety equipment, like safety glasses and gloves, should also be worn during this process to prevent accidents.
5. Can pavers be installed directly on concrete?
Yes, installing **pavers on concrete** is feasible. However, proper preparation is essential. To achieve stability and ease drainage, ensure a solid leveling bed layer is created using sand or gravel before placing pavers directly on the concrete surface. This method can enhance the overall appearance of concrete when pavers align with your landscape design.
6. What should I consider for drainage when installing pavers?
Effective **drainage for paver installation** must be considered to prevent water pooling and project degradation. Sloping the paver surface away from structures ensures proper water runoff. Implementing a perforated drainage system or using permeable pavers can significantly enhance water management, providing longevity and durability to your paver installation.
7. How often should I seal my installed pavers?
Generally, it’s advisable to seal installed pavers every one to three years, depending on usage and exposure to the elements. Regular sealing protects the pavers from staining, growth of algae, and enhances their color. Thus, creating a long-lasting and vibrant paver surface requires some foresight and an awareness of your local environment.